Age
2 years and over
Duration of activity
Your child can play with the magnetic chalkboard for just a few minutes. However, there are many different activities this board can be used for and some will keep your child busy for more than half an hour.
Materials/equipment
Simple magnetic blackboard
- An old baking tin/cookie tray (or anything else with a flat metal surface). Use a smaller tray if you want it to be more transportable. You could also buy a large magnetic board new for this step.
- Chalkboard paint (in colour of your choice – commonly available in green and black).
- Chalk.
- Chalk wiper.
Ornate magnetic blackboard
- A sheet of metal- you can buy this new from the hardware store or recycle an old cookie tray (or anything else with a flat metal surface).
- Chalkboard paint (in colour of your choice – commonly available in green and black).
- Frame.
- Brackets for securing the frame to the metal sheet.
- Hook for hanging blackboard to wall (suited to size and weight of your blackboard).
- Spray paint to paint your frame the colour you choose.
- Photo ledge (skinny shelf with a lip) which holds the chalk.
- Screws for attaching photo ledge to wall under blackboard.
- Chalk.
- Chalk wiper.
Cost
Simple magnetic blackboard
You can recycle an old biscuit tin you already have to save needing to spend any money on that. Or if you don’t have one, you could get one from a charity shop or even a new one from somewhere like Kmart for $3. You can also buy large silver magnetic boards from Ikea for $20.
Half a litre of blackboard/chalkboard paint will cost $20-25 from the hardware store.
You can reduce the cost of the paint by doing this activity with several other parents (a tin goes a long way) and sharing the cost of the paint.
Ornate magnetic blackboard
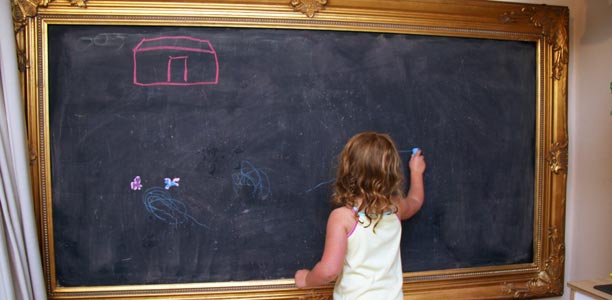
The cost will depend on the size of the blackboard you are making and what type of frame you use. The pictured magnetic blackboard above used an antique mirror frame (where the mirror was broken and bought second hand online) and cost $200 to make. However, it is 2.2m long by 1.2 m high and also has a shelf.
Preparation
Simple blackboard:
- Paint your baking tin with the blackboard paint. Leave it to dry.
More ornate hanging blackboard:
- Paint your metal sheet with the blackboard paint. Leave it to dry.
- If your frame is in need of a touch-up, spray paint and leave to dry.
- Spray paint photo ledge and leave to dry.
- Use brackets to suit the size of your frame, to attach your blackboard to the wooden frame.
- Hang frame on wall.
- Drill photo ledge into wall.
What to do
The magnetic blackboard is a fabulous resource for helping your child develop language, mathematical and other skills.
- Use the magnetic blackboard to play story telling games with character magnets. Telling stories using a magnetic blackboard will provide your child even more opportunities to express their creativity because they can draw scenes on the blackboard before they stick the characters on and tell their story. For example, they could draw a barn and animals if they wanted to tell a story about their character visiting a farm.
- Buy or make a set of magnetic letters and help your child put them together to create words. For example they could write the names of characters underneath them.
- Add magnets to a set of number flash cards and use these on the chalk board to work through maths problems or play matching games. Your child could use chalk to draw the mathematical symbols between numbers to make sums (e.g. 1 + 1 = 2). For younger kids just saying the numbers out loud and putting them in the correct order might be challenging enough.
- Add magnets to a set of shapes flashcards and use these to play matching games. For example, you could put two sets of shapes in columns on the left and right of the board and get your child to chalk a line between the matching shapes.
- Use the chalkboard to practice reading and writing. It’s not only a great way to learn, it’s also more environmentally friendly. When your child writes on the board they will be developing their finger muscles and hand writing skills just as they would writing with a pen, but you won’t be using reams of paper.
- Give your child some chalk and let them get creative. Watch them while they draw and talk to them about their art works. Young kids will probably need a bit of encouragement to persist and finish their drawings.
Tips

- Once you have made your magnetic blackboard you need to ‘prep’ the board by turning the chalk lengthwise and essentially colouring in the whole board. Then dust it off. The board will be much easier to write on once it has had a layer of chalk over it.
- Take photos of your child’s favourite chalkboard creations. Print them out (at a photo service) and display them on your child’s bedroom wall. For their best masterpieces, you could even enlarge and frame them.
- Fix the chalkboard to the wall or back of the door of your child’s bedroom so it’s accessible whenever they want to play. See more great ideas for decorating kids rooms.
- If you use a baking tray to make the magnetic chalkboard, this can become a transportable busy bag. Put the tray in a large zip-lock bag with some chalk and magnets.
Safety
- If you are using a recycled sheet of metal to make the chalkboard, make sure it is not rusted.
- Supervise children at all times while making the magnetic chalkboard as you use many hazardous materials such as paint, spray paint, screws, drills etc.
Educational outcomes
Fine motor skills
Fine motor skills, the skills which enable a child to use the small muscles in their fingers to manipulate objects, can be developed in many different ways using the magnetic chalkboard. Writing with chalk will help your child improve their hand writing. Pulling magnets off and putting them onto the chalkboard is also a great way for your child to strengthen and coordinate their finger muscles.
Communication and social skills
Every time you play a game with your child using the magnetic blackboard you will also be giving them an opportunity to practice communicating and socialising. Engaging in conversation with you, helps your child understand social conventions such as taking turns, listening and answering and expressing their ideas in a way that someone else can understand. As they make gestures and facial expressions to communicate ideas to you (and watch you do the same) they’ll be developing their awareness of the ways body language can be used to communicate.
When you use the magnetic chalkboard to tell stories about character magnets you allow your child to create a make believe world. Exploring their ideas through make believe is a great way to help your child understand the real world around them and the ways in which people interact with and depend on others.
Language and literacy skills
As you talk to your child throughout the games, they’ll be putting their language skills to practice and further developing their vocabulary and grammar. Be conscious of using the opportunity. Help them practice new words and understand their meanings and construct increasingly complex sentences. A child’s vocabulary increases from about ten words at 15-18 months to over 2000 words before the turn six years old. Hearing new words used in conversation is an ideal way to learn them. Take the time to pronounce difficult words with your child, sounding out the syllables. Speak in simple sentences that your child will understand (exactly what you say will depend on their age and the game they’re playing). Ask open ended questions that encourage your child to give descriptive answers and talk about their ideas and feelings.
Writing on the blackboard with chalk or using magnetic letters will help your child develop their literacy skills. This includes concepts like printed words representing spoken words and being written from left to right and top to bottom. They will also become aware of the way letters go together to make words and words are combined into sentences. You can also help your child learn to read by asking them to read aloud what they have written (or for younger children reading aloud what you have written while using your finger to follow the text).
Math skills
There are plenty of games you can play with the magnetic blackboard to help your child understand mathematical concepts and practice mathematical skills. Writing numbers or playing with magnetic numbers can assist with counting and understanding what numerals represent. Matching games which can be played using number and shape flashcards help your child understand mathematical concepts like size, colour and patterns. You can also draw your own matching games (e.g. match 3 triangles with the number 3) or patterns (e.g. square circle square circle) on the chalkboard, using the flash cards as a template.
Think about your child’s age and ability when planning your blackboard games. If your child is about three years old they will probably know how to count to three, whereas four year olds will probably be able to count 5-10 objects. Two year olds may be able to use comparative words like big and small but probably won’t use more complex terms (e.g. long/short) or concepts like big, bigger biggest until they are three or four years old.
References
- Virginia Early Childhood Development Alignment Program. Milestones of child development- A guide to young children’s learning and development from birth to kindergarten. 2009. (cited 26 July 2013). Available from URL Link.
- Queensland Health. Physical and cognitive milestones. 2007. (cited 31 July 2013). Available from URL Link.


 (11 votes, average: 4.64 out of 5)


